Putting a Live Linux Security Distro on a Portable USB Drive
Having a ready-to-run portable Linux-based security tool set can be very useful. Although similar to the classic CD/DVD-ROM based bootable distributions, a USB-based toolkit can be a real life saver if the computer you wish to run it on doesn’t have a working optical drive. The process of writing data to the boot record of a USB drive isn’t exactly common knowledge. Although there are many ways to do this, I will outline a very simple procedure below.
You will need:
- 1 portable USB drive with adequate space on it (available at Amazon, Newegg, etc)
- 1 copy of BackTrack in ISO format (or other live Linux distribution)
- 1 copy of UNetbootin (open source)
Step 1:
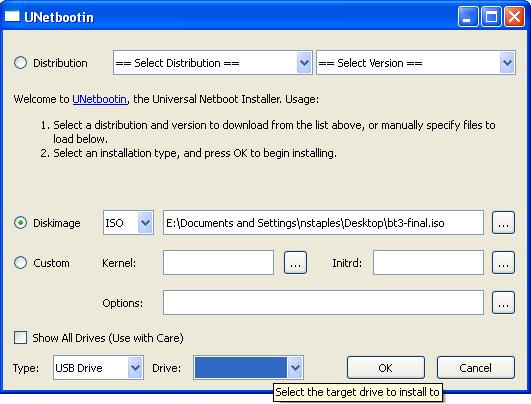
Plug in your USB drive and run UNetbootin
Step 2:
In the “Diskimage” section, enter the disk location of the BackTrack ISO image
Step 3:
In the “Type” dropdown box, make sure “USB Drive” is selected and in the “Drive” dropdown box, select the drive letter corresponding to your portable USB drive.
Step 4:
Click “OK” and wait for the program to work its magic
When it’s done you should have a nice bootable USB drive containing a live Linux distribution– perfect for peeking at the hard drives of a host computer, troubleshooting network problems, or impressing your friends.
Each Tuesday, Security Musings features a topic to help educate our readers about security. For more information about Gemini Security Solutions’ security education capabilities, contact us!
2 thoughts on “Putting a Live Linux Security Distro on a Portable USB Drive”
I have posted a complete how-to for the linux newbs at LinuxBuzz.net
Thanks for the awesome post, it helped me out a lot.
Comments are closed.